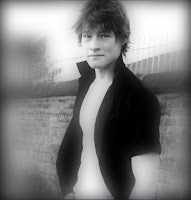
photo shopped gradient effect;

by using the gradient tool with a choice of colours at a low opacity, until it looked like the above picture.
Photoshopped vignette effect;


By changing the gradient tool to paint bucket tool, and turning the image fully black. Then getting the eraser tool and carefully, in a circular motion making the outside of the image outlined in black.
photoshoped color tint;

By turning the image black and white, then changing the color to a tint of your choice.
photoshopped cling film effect;
photoshopped cling film effect;

By putting a gaussian blur on the image then using the eraser tool to make the image more clear on selected parts.
step by step screenshots of how I Softened my friends skin with photoshop.
- I created a background copy.

- then I selected the spot healing brush.

- smooth it over her face to take way her spots.

- then I selected the "blur tool" and blurred her face and hair.

- then I used the eraser tool to sharper n the parts of the image I desired to keep sharp, leaving her skin smooth.

- I created a background copy.
- then I selected the spot healing brush.

- smooth it over her face to take way her spots.

- then I selected the "blur tool" and blurred her face and hair.


No comments:
Post a Comment