Thursday 29 September 2011

'Darren Hall Research'

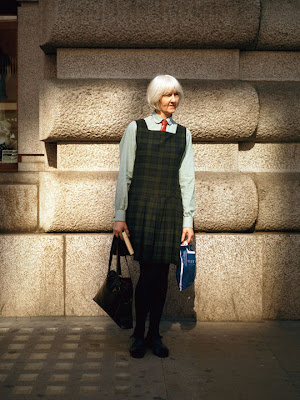
Darren Hall is well known photographer, he works for ID magazine and his work is based in England and New York. Hes most famous for "straight up" street photography in which he never uses a flash- always natural light and he uses great deals of colour contrast and shadowing within hes images he also takes backgrounds and settings into consideration when he captures his images, he captures with both portrait and landscape images. He normally asked hes subjects to keep a straight face for his photos so that the viewers eyes are not drawn to person's expression but the more important factors of his images.


'Low Key Studio Portraiture 2'

These are the images I took of Liz, some are edited and these images are the result of the shoot
we did in low key lighting set ups. (ISO 200, F11,shutter speed 125)


'Studio Portraiture, low key lighting'

We learnt four different forms of low key lighting set ups and took shots of a model in these set ups. Me and Liz then stayed back and did extra work doing more shots in these set ups so we could improve our skill and gain more experience of studio work.

For these shoot we had the ISO set to 200, we took a light measurement with a light meter and it read F11 and the shutter speed set at 125.

The forth lighting set up we learnt was using a reflector and two lights, on to the left of the subject and one directly behind the subject head in order to get the haloed effect but with reflected light from the right hand side of the subject which we produced by using a sheet of sliver mirrored card in order to get a harder reflection, if we wanted to get a softer reflection we could have used a white material as the reflector. (see image below for my example of this set up.)


The third set up we learnt was with two lights, one on the left of the subject and one directly behind the subject head but this time it was turned around, facing the backdrop and the honeycomb was taking off so that the light was then spread wider across the back to gain a “spot light” effect from behind the subjects head. (See image below for my example of this set up.)

The second set up we learnt was with two lights, one to the left of the subject and one directly behind the subjects head, facing forward towards the photographer in order to gain a “halo” effect . (See image below for my example of this set up.)

The first set up we learnt was with just one single light to the left of the subject. (See images below for my example of this set up.)


(See post "Low Key Studio Portraiture extra" to see the images I took of Liz.

Tuesday 27 September 2011

'Painting with light 3'


extra work I did in my own free time to try to improve my skill in this particular photography technique.
I was trying to capture a symbol perfectly, I choose "the love heart" and these were the results;


I also tried to capture a smiley face this was the result;


Aperture.

Aperture is 'the hole' in which the camera lets light in, by changing the aperture it changes the size of the whole is, thus changing how much light the camera is letting into the image. The smaller the F-number the bigger the hole will be and the greater the F-number the smaller the hole will be. F-stops also change the depth of field on a camera, by using a shallow depth of field the photographer is able to get less of the image in focus thus being able to put more attention on smaller details of the picture which is always good for doing portrait shots and still life. Having a wide depth of field means that more of the picture or even all of the image will be in focus, this is better for doing landscape shots.


Deep depth of field;


shallow depth of field;


Shutter Speed.

Shutter Speed is a setting on the camera which controls the speed of the shutter.
changing the shutter speed effects the pictures greatly as a fast shutter speed would allow the photography to capture someone moving and freeze that motion in time on the other hand a slow shutter speed would allow the photographer to capture the movement for the duration that the shutter is open.


For example using a slow shutter speed would allow the photographer to have this effect;
(non of the following images are mine, see "'Painting with Light' 1,2, and 3 to see my examples.)


for example using a fast shutter speed to capture something within sports the photographer would be able to do this sort of effect;
(See "Freeze motion" for my examples.)


Monday 26 September 2011

Report.

I should be on the BTEC Art and Design Photography course because I’ve had a growing passion for photography for many years now, I’ve always love the idea of capturing a moment and making a last over a lifetime, and the fact that a single second could be the difference between a picture which is truly beautiful and a picture that is just ‘ok’. Whilst on the course I have learnt that there are more aspects to a photo then I first thought, I’ve learnt about F-stops and F-numbers, aperture and ISO, which I feel has made me grow as an aspiring photographer coupled with the other lessons, which have really made me open my eyes to things around me more, I see more interesting things happening and this shows in the pictures I take and they’ve improved greatly because of this. In the course so far I really enjoyed going out and doing “Architectural photography’, I also really enjoyed learning about how to create animations with images and painting with lights. I’ve enjoyed basically everything so far in the course even the art lessons which I wasn’t looking forward to doing because I’ve never being good at drawing I was happy to find out that the art and design we do it related to photography and I’ve found that it has helped me improve my photography skills. The things I haven’t enjoyed is when we go out in massive groups and I found it more difficult to take a good amount of photos that I was happy with they could have improved by spitting the groups up. I think I could improve by really thinking about the things I’ve learnt and trying my best to make it show in my work more.

'Animation'


Today we were doing animation with images we took off webcams.
we had to do slight movements and take a picture so that the photos when put together on premier looked like a movie and less like photos. The video above is what I came up with and the second half is what me and Liz came up with together.

Friday 23 September 2011

'Painting with Light' 2

I took these photos a day before we learnt how to "paint with light" with torches.
I did these images by putting my camera on a slow shutter speed and turning the camera as I took the picture.


'Painting with Light'

Here we used a slow shutter speed so we could draw with lights and create images and patterns.
I had to adjust the exposer and ISO so I could get the background darker so that you could only see the light and not the background aswell.


'Freeze Motion'

On this day we used a fast shutter speed to try capture someone moving but freezing the image of their movement. The quality of the images taken are poor as my camera couldn't expose right with the lighting of the room so the photos result is grainy but all in all I managed to capture some good shots of freezed motion which are shown below.


Tuesday 20 September 2011

'Architectural Photography'

On this day we learnt more about leading lines and forms.
Leading lines in a photo give a visual guide through the photo and often lead the eye into the greater purpose of the photo.
we went out and took photos these were the outcome of it.

I also changed the shutter speed to I could capture the fountain in an interesting way by making the shutter speed slower I captured the fountain in motion and the water below looks like it's part of a painting.